I.H.T.L
How to recolor IHTL Button Braids
---------------------------------------------------
If you do not have photoshop with 3D functions you can find a very simplified version at the bottom of the page!
What you'll need:
-
Some basic knowledge on how to work with the 3D mesh in Photoshop
-
Photoshop Extended (You need the 3D functions to follow this tutorial)
-
The Sims Resource Workshop (TSRW)
-
IHTL Button Braids Tutorial Resources (Make sure to extract all files into a new folder)
-
Sims 3 Package Editor (s3pe)
If you wish to skip the TSRW steps you can use Sims 3 Package cloner if you know your way around it, the steps are a little different but you should be able to figure out the cloning and then replacing textures in s3pe. This tutorial will not cover this.
TUTORIAL STEPS
(click the steps to automatically scroll to them)
2. Making the textures (Photoshop method)
GETTING STARTED
STEP 1: Start by deciding which version of the mane you want. Right or left side. Make a work folder for your mane to keep track of everything.
STEP 2: Open up TSRW. Next click on "Create new project". In the next window that pops up select "New Import"and click next. Hit the browse button and navigate to where you saved the resources from the "What you'll need" section, choose if you want the right or left. For the purpose of this tutorial I will use the left version. Double click the "IHTL_Button_Braids_LeftV3" file and in the window that pops up and asks if this is a Sims 4 package- click no. Make sure to uncheck "preserve group ID and hit next.

STEP 3: In the next window give your mane a name and hit next and then hit "OK". TSRW will now open your newly cloned file. For now we are done with TSRW but we will come back soon.
MAKING THE TEXTURES
(PHOTOSHOP METHOD)
STEP 4: In the files you downloaded there are two .psd files with the horse 3D mesh for each of the manes. (ah_rig_Left & ah_rig_Right) Open the one you picked in PS and open the textures by double clicking on "__PS_3D_Default - Default Texture"
STEP 5: Now it's time to get your marking onto the 3D mesh. If you have an unmerged version of you marking you can simply paste it onto the textures (If it's any other resolution than 2048 x 2048 you might need to rescale it, don't worry about it looking blurry or anything, we just need it as a guide so we know which braids to make white)
If you only have the finished marking you need to export the .dds using s3pe and then paste it onto the flat textures. To do this you need to open the package file for the marking in s3pe and right-click the file in the list that has the IMG tag. Choose "export" and "to file".


Save it to your work folder and open in PS. Resize to 2048x2048 px and then hit ctrl-A on your keyboard to select all, next go back to the flat texture for the 3D file and paste it with ctrl-V. Move it to the bottom just above the background layer, this will ensure it won't interfere with anything once we are ready to save. You can set the layer blending mode to "color" or "subtract" to get rid of the black which will make it easier to see.
Now go back to the 3D mesh and it should update with the markings and look something like this:

STEP 6: Now it's time to count button braids! Follow the diagram below to see which braids you need to make white (these would be the braids that the white goes over)
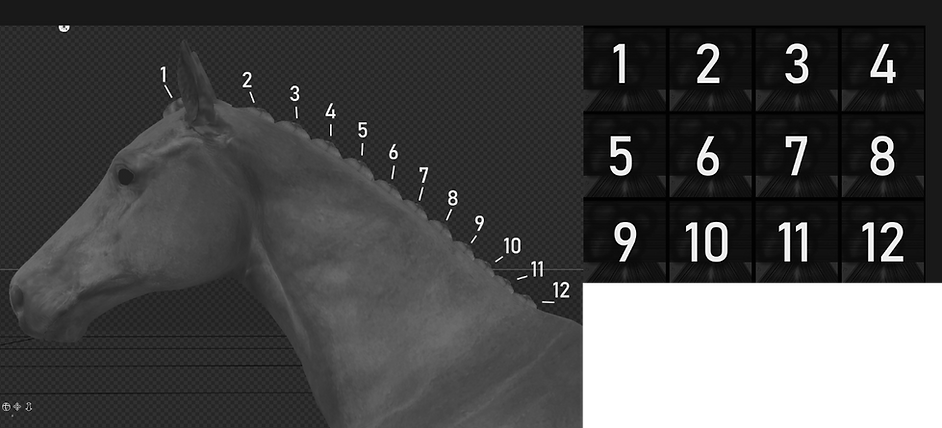
Looking at our marking on the 3D mesh we can see that braids 5-12 would be white so now we go back to the flat texture and paint RED (#ff0000) over the braids we want white on a NEW LAYER above the "Control Map" layer. It should look something like this:


Now, you can get as fancy as you want with this or keep it simple. If you prefer simple you can skip the next part and go straight to "Saving & importing/exporting"
--------------------------------------
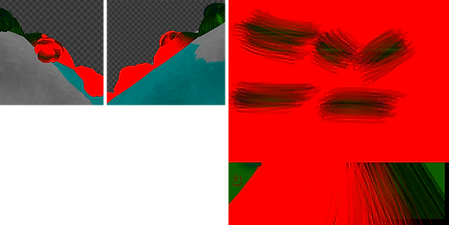
I like to paint some individual hairs on braids where a bit of the braid crosses over from the white to normal coloring, to get a smoother and more realistic transition.
To do this I first remove all the red from the 5th braid (this depends on where your white starts and stops) and make a new layer and paint over most of it again since this braid is mostly white.
Now you can reduce the opacity a little on the red just to see what you are doing. Next I take a round brush and a hair brush with the eraser tool to start removing "strands" of hair from the red over the "base" part which is this on the textures:

I keep adding and removing paint with the brush and eraser tools until I am happy with the smoother transition.
Then I erase/paint over the little blobs a bit to give the illusion that normal colored hair is dispersed in the braid. This can take a bit of work but just keep adding and removing (play around with opacities too!) and keep going back to the 3D mesh to see how it looks.
When you are done you should have something that looks a little like this:
The next step is to save our dds/png and then import it into TSRW.
STEP 7: Go to the flat map and put the opacity of all layers to 100% if you reduced the opacity in the last
part.
Next unhide the black layer called "UNHIDE WHEN SAVING". Everything should now be covered with black except the red we've painted and the "Control Map" layer. Next go to "Save As" and save as .dds/png to your work folder (Make sure it's saved as interpolated alpha if you are saving as a dds!)
SAVING & IMPORTING/EXPORTING

Now we go back to TSRW and open up the textures tab. Scroll down and expand the "hair" textures section.
Next click the control map and an edit button should appear, click it and in the next window that opens up hit "Import" and navigate to where you saved your new control map. Open it up and hit done.


**If you saved it as a png you will have to change the file type displayed from "DirectDraw Surface (*.dds)" to "Bitmap Image (*.tif, *.png)" in the bottom right corner of the new window. Double click it and a new window should appear- if you have done everything correctly you should just be able to press continue and then "Done"****

In the next window that appears click "Yes". Now, nothing much has appeared to have changed but our new mane will now use our new control map when recolorting the mane!
We are now are ready to export the mane. You do this by going to the menu in TSRW and hitting "File" > "Export" > "To Sims3Pack". Give it a name and convert it to package with Delphy's Sims 3 Pack Multi-Extracter. (This step is important if you want to make a custom thumbnail for you mane!) Read the instructions on the linked page to learn how to convert it if you don't already know how.
You can export to package immediately from TSRW but this will result in a bigger file as it won't be compressed :)
TESTING & THUMBNAILS
STEP 8: Now that you have your package file you can plop it in your mods > package folder and start your game! Go into create a sim and open the horse the mane is intended for, put it on and make sure everything is matching and looking good. The roots will be the channel you need to make white.
If you are unhappy go back to the textures step and work on it some more. If you are happy, great! I wasn't happy so I went back and made some minor changes ;)
It's time to let the game generate the thumbnail for the mane. Once that is done you can close your game. If you do not wish to make a custom thumbnail you are now finished! Yay!
STEP 9: For this step we will need to open up the "CASThumbnails" in your documents folder. Typically "*:\Libraries\Documents\Electronic Arts\The Sims 3\Thumbnails"
Double click it to open it in s3pe or open s3pe and choose File > Open and navigate to the CASThumbnails package. It is important that your game is not running at this point because then s3pe won't allow us to open the file!
Next we need to also open the mane package in s3pe to get what is called the instance number from the CASP resource. Big words but don't worry, it's not as scary as it sounds!
Locate the "CASP" resource and double click it, in the new window under instance is a long string of numbers and letters, copy it and click cancel.

Now we go back to the s3pe window we have open with the CASThumbnails file. To be able to search for the thumbnail that we need we will have to enable some filters. Follow the steps in the picture below.

After you pressed "Set" s3pe should now filter all your thumbs and you should have one image left in the list, export this by right-clicking it and choosing export > to file. Don't rename or change anything! Save it to your work folder. Next select the same resource we just exported and hit the delete button on your keyboard (or right-click it again and choose "Deleted") Save this package with ctrl-S (or go to file and click "Save") then close it.
STEP 10: Open up the provided thumbnail template and make your template. This step is entierly up to you, you can put a picture of your horse or just a simple text thumbnail, go wild!
You can use the guide layers to see what will we visible on your thumbnail in game but don't forget to hide them when you're done.
Once you are happy and finished with your thumbnail save it as a .png and replace the file we exported from CASThumbnails.
Now go back to the s3pe window with the mane opened and choose Resource > Import from file and choose your thumbnail png. In the window that pops up leave everything as is and click ok. Now you can save your package and test in game again!

If everything shows up correctly you are now finished! Wohooo we did it!!
If something isn't working- go back and make sure you did everything correctly, if you did and something's still wrong don't hesitate to contact me and I'll do my best to help!
Here is our result :)


Big thanks to Zahid Sadir for letting me borrow the gorgeous TMBR Rosario's marking that you can peek in the images above!
FINAL NOTES & SIMPLIFIED METHOD
I hope this tutorial was easy enough to understand and I hope I haven't missed anything! As I've said before and again below if you have any questions or run into any issues you can contact me on discord or use the form on the website (Discord will be much quicker though!)
If you do not have photoshop and/or prefer and even simpler version or even if you have used moveable markings to make your horses you can follow a very simplified version below. For this you will not need any special photo editing software, anything capable of handling .png files should suffice.
1. Start by looking at your horse in game with the normal button braided mane on. Use the diagram above in the "Making the textures" step and make a note of which braids should be white.
2. Open the provided "Simple method" png and paint red over the braids you made a note of before, save as dds or png.
3. Follow the steps in the "Getting started" and "Saving & importing/exporting" to learn how to do all TSRW related steps.
4. Do the steps under "Testing & Thumbnails" if you wish to have a custom thumbnail for your mane.
~Fin
If you run into any issues feel free to add me on discord (Aliensstolemymind#1004) and shoot me a dm and I'll do my best to help!